Recording Audio
Capture rehearsals, song ideas, voice notes, podcasts and live takes with acceptable loudness from the start. A real-time FX chain adjusts volume on the fly, and color markers let you tag takes without stopping.
In this guide (6 topics) ▸
Starting a recording#
To start recording, tap the Microphone icon (🎤) in the top bar of the library or tap Record on the quick action bar.
If you have multiple projects set up, LiveMarks prompts you to select where the recording should be saved, or you can choose Record to new project.
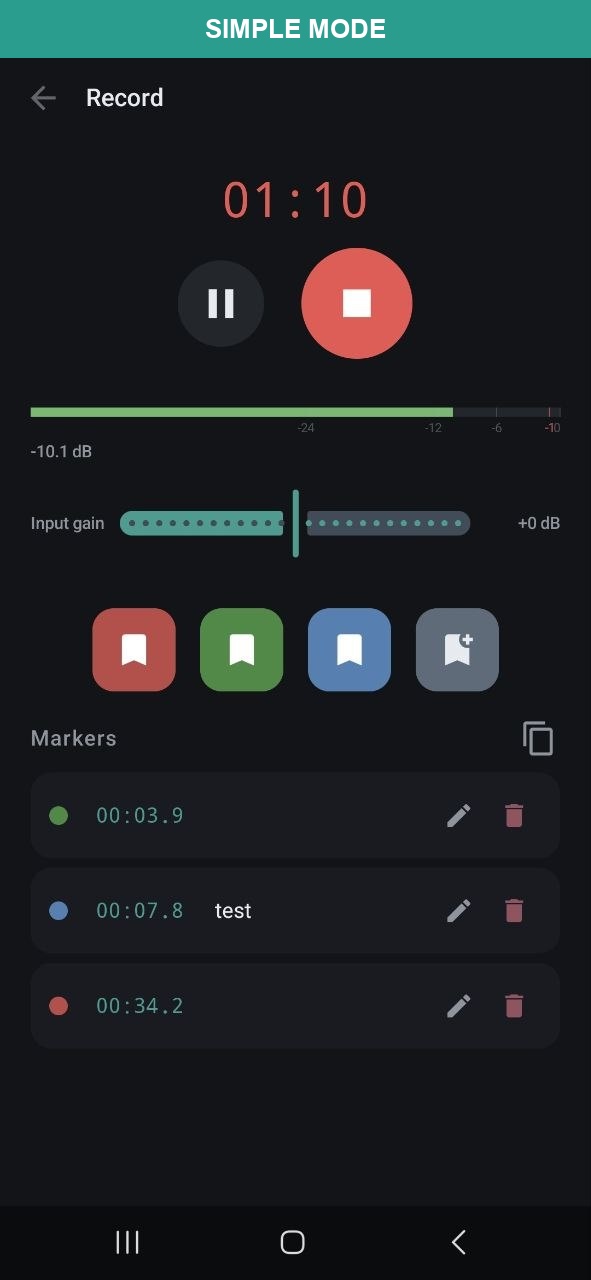
The dedicated recording screen opens with:
- Large digital elapsed-time counter.
- Live peak level meter with digital dB readout.
- Input gain slider (-12 dB to +12 dB).
- Big Pause and Stop controls.
- Quick color marker buttons and real-time marker list.
Microphone permission is requested on your first recording. LiveMarks records in compact high-quality AAC (~192 kbps) or uncompressed 16-bit PCM WAV (44.1 or 48 kHz), selectable in Settings.
Real-time FX chain & loudness#
When recording compressed formats (such as AAC / M4A), files cannot be cleanly peak-normalized after encoding without decompressing and re-encoding. To solve this, LiveMarks features an active real-time DSP FX chain that adjusts volume and controls dynamics on the fly while recording:
Microphone → Input Gain → [Auto-Gain AGC + Compressor + Brick-Wall Limiter] → Output File
This ensures your recordings always achieve an acceptable, commercial-like loudness directly from the mic:
- Auto-Gain (AGC): continuously monitors the signal level and smoothly rides the volume up or down sample-by-sample on the fly. Quiet speaking or distant acoustic instruments are gently boosted so they remain clearly audible, while sudden loud sounds are quickly reined in.
- Compressor: a gentle 2:1 ratio compressor with a soft knee that evens out musical dynamics and keeps vocals or rehearsals cohesive without audible pumping.
- Brick-Wall Limiter: a zero-latency peak limiter set at -0.5 dBFS that catches transient spikes and guarantees zero digital distortion or clipping.
Simple vs. Advanced Mode
| App Mode | FX Chain Behavior | Configuration |
|---|---|---|
| Simple Mode | Fully automatic. The FX chain runs in intelligent Auto mode in the background so you never have to think about engineering parameters. | Automatic (no setup required). |
| Advanced Mode | Configurable in Settings → Recording → Compressor Mode with three distinct options. | Choose between Auto, On, or Off. |
The three compressor modes available in Advanced Mode:
- Auto (Compressor + Auto-Gain): Default. Full real-time auto-gain riding, gentle compression, and brick-wall limiter for effortless, consistent loudness on the fly.
- On (Compressor ON, AGC OFF): Fixed studio compression and limiter without continuous automatic gain riding. You have full manual control over the input gain slider.
- Off (Limiter Only): Bypasses compression and AGC completely for pure, raw acoustic dynamics, protected only by the brick-wall safety limiter to prevent clipping.
Input gain & peak meter#
In addition to the automatic FX chain, LiveMarks provides hardware-level monitoring right on screen:
- Peak Level Meter: a responsive level bar showing instantaneous signal strength. The meter stays green up to -12 dB, turns yellow between -12 dB and -6 dB, and flashes red above -6 dB to warn of imminent digital clipping.
- Numerical Readout: displays exact peak dBFS values (such as
-10.1 dB) so you know exactly how much headroom you have left. - Input Gain Slider: fine-tunes microphone sensitivity from -12 dB to +12 dB before or during recording. Higher values drive the compressor harder for a denser sound; lower values give maximum headroom for loud drums or guitar amps.
Aim for peaks hitting between -12 dB and -6 dB during the loudest passages. This leaves ample safety margin against clipping.
Dropping live markers while recording#
LiveMarks’ standout feature is the ability to drop timestamped markers in real time while the recording is active — without stopping, pausing, or introducing audio clicks.
Directly beneath the input gain slider are three colored quick buttons plus a detailed marker button:
- Red: tap to mark a mistake, bad take, missed lyric, or section to re-record.
- Green: tap to highlight a keeper take, great solo, or standout vocal harmony.
- Blue: tap to flag an arrangement idea, question for mixing, or structural cue.
- Add Marker (+): opens a quick dialog to type a text note and add a hashtag (e.g.
#bridge) while recording continues in the background.
Markers are placed silently and instantaneously with zero recording latency or stutter. You can mark throughout a 2-hour rehearsal without ever touching the Stop button.
Managing markers on the fly#
Every marker placed during the recording immediately appears in the live marker list at the bottom of the screen, complete with its timestamp (e.g. 00:03.9, 00:34.2) and color dot.
| Action | How |
|---|---|
| Edit note & tag | Tap the pencil icon next to any marker to add or change notes while recording. |
| Delete marker | Tap the trash icon to instantly remove an accidental marker tap. |
| Copy as text | Tap the copy icon at the top of the marker list to copy all timestamps and notes to your clipboard. |
Pause, stop & saving#
Controlling your recording session:
- Pause & Resume: tap the Pause button to take a break between takes. The timer pauses and the audio stream pauses cleanly without creating separate files. Tap Resume to keep adding to the same track.
- Stop: tap the large red Stop button when you are done.
File Finalization
- Loudness & WAV Normalization: Compressed AAC recordings already have optimal loudness baked in thanks to the real-time FX chain. For uncompressed 16-bit WAV recordings, LiveMarks additionally performs an in-place peak normalization pass at the end of recording (scaling headroom to -1.0 dBFS) to optimize signal-to-noise ratio.
- Metadata & Cues: all timestamps and marker notes are written into the file metadata and RIFF cue chunk.
- Immediate Availability: the file is saved into your chosen project library and opens in the player immediately — ready for looping sections between markers, A/B comparing against reference tracks, or exporting to your DAW.