Playlist & Mastering Console
Play many tracks in a row at the same perceived loudness, then use the Mastering Console to see exactly what LiveMarks does to each track, and turn the overall level up safely.
In this guide (9 topics) ▸
Start a playlist#
- In the library or a project, tick two or more files and tap Playlist (n). In a project you can also use Play all.
- Use the previous / next buttons to move between tracks. The list title shows the position, for example
Track 3/12. - Turn on LM to level-match the playlist. Use the shuffle button for random order and the loop button to repeat the playlist.
A typical use: put your own mix between four or five commercial reference tracks and listen to the whole playlist at matched loudness. Does your track stand out, or blend in?
How playlist level matching works#
Playlist level matching works in three steps, for every track:
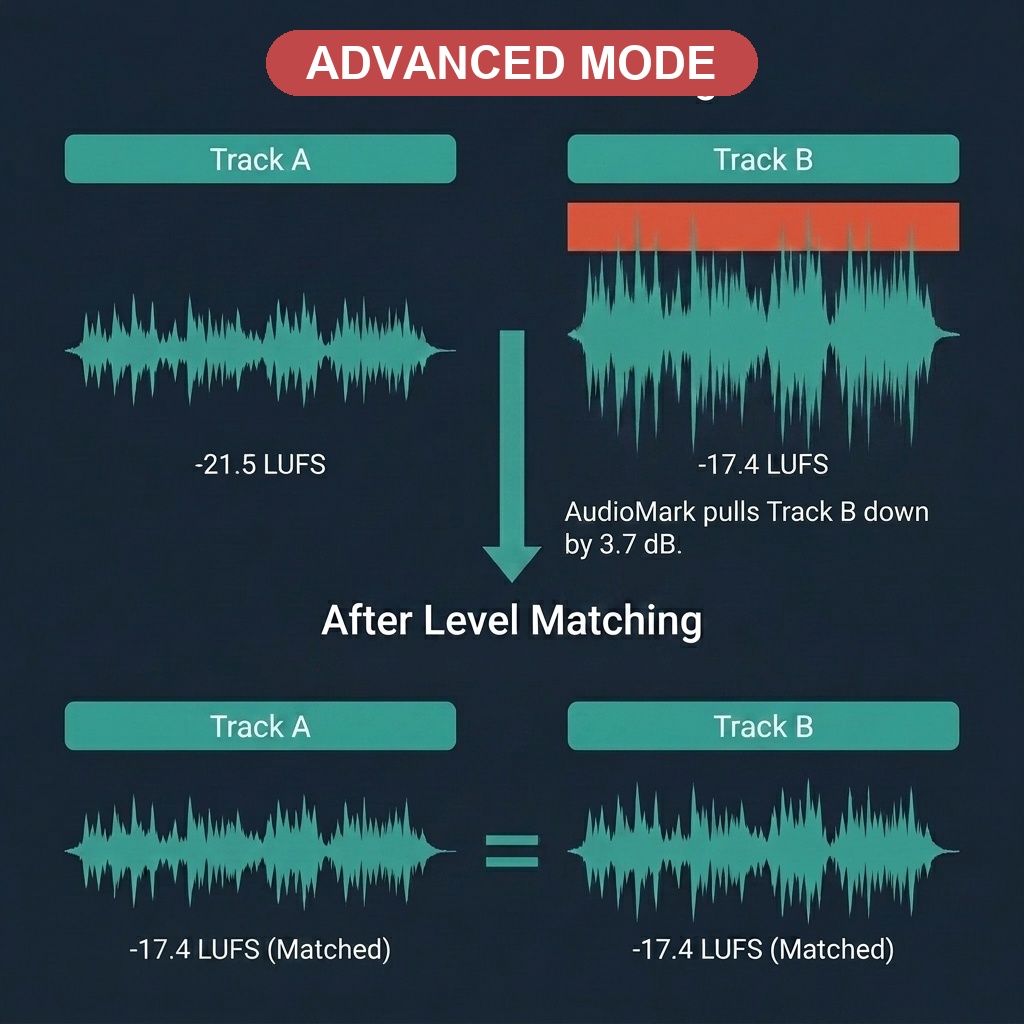
- Find the target. LiveMarks finds the quietest track in the playlist. Its loudness becomes the target for all tracks.The target never goes below -30 LUFS, so one extremely quiet file can’t drag the whole playlist down.
- Turn down. Every louder track is turned down to the target. This is the Reduction value. Turning down never causes clipping.
- Turn everything up together. Because everything is now at the level of the quietest track, the playlist can feel quiet. When LM is activated, the GAIN slider adds makeup boost. How much boost each track actually receives depends on the mastering mode (Safe or Pro) and whether the track is too dynamic.
Open the Mastering Console#
The Mastering Console is a panel at the bottom of the playlist player (Advanced Mode only). To turn it on:
- Open Settings, for example from the ⋮ menu in the player.
- Under Playlist Mode, switch on Mastering Console.
Tap the small yellow arrow in the corner of the console to expand or collapse the detailed view. Collapsed, it shows only the header, DRIVE meter and GAIN slider.
Reading the console#
The header shows the mode and the target, for example Mode: SAFE | Target: -14.2 LUFS.
The expanded view shows three columns: PREV (previous track), CURR (playing now, highlighted) and NEXT. With shuffle on, the last column is called NEXT (RND) and shows the randomly chosen next track. Each column contains:
| Value | Meaning |
|---|---|
| LUFS | The measured loudness of the track. |
| Peak | The highest peak level in the file, in dBFS (0 = digital maximum). |
| PLR | Peak-to-Loudness Ratio: Peak minus LUFS. A high value means a dynamic track with strong transients. A low value means a dense, heavily limited track. |
| Reduction | How much the track is turned down to reach the target (shown in orange when below 0). |
| Boost | How much makeup gain this track actually receives from the GAIN slider (shown in green when above 0). |
Labels next to the column title:
- [REF]: this is the quietest track, the one that sets the target. Its reduction is 0.
- [DYN]: a highly dynamic track (see PLR and the DYN flag).
Example. Target -14.0 LUFS. A pop master at -8.5 LUFS shows Reduction -5.5. With GAIN at +3.0 dB in Safe mode, it may show Boost +3.0 if it has enough headroom, or less if a full boost would clip.
GAIN slider and DRIVE meter#
- GAIN (0 to +15 dB) is the makeup gain you ask for when LM is active. It applies to the whole playlist.
- DRIVE is a meter in the header that shows how much boost the current track is actually getting: green up to 5 dB, yellow from 5 to 10 dB, red above 10 dB.
Start with GAIN at 0, listen, and raise it slowly until the playlist feels as loud as you want. If DRIVE is in the red in Pro mode, the limiter is working hard and the sound becomes denser.
Safe vs. Pro mode#
Level matching and makeup gain only apply when LM is activated. Choose the mode in Settings → Playlist Mode → Mastering Mode.
| Mode | How it works | Sound |
|---|---|---|
| Safe Match (Linear) | Pure volume change when LM is on. Each track only gets as much boost as it can take without its peaks going over 0 dBFS. Tracks without headroom get less boost than the slider shows. | Completely transparent. Nothing is compressed or limited. |
| Pro Match (4-Band Glue) | When LM is on, tracks receive the full boost as long as they are not too dynamic (PLR ≤ 18 dB). A 4-band mastering chain and limiter catch the peaks. Highly dynamic tracks ([DYN]) automatically bypass the limiter and are capped to available headroom just like Safe mode to protect transients. | Louder and denser, closer to a commercial master. |
In Pro mode you can also choose the Pro Tuning Character:
- Natural (Transparent): keeps transients intact. Good for classical, jazz and acoustic music.
- Punchy (Excited): denser and more energetic. Good for pop and rock.
Pro mode needs a device with enough processing power. On devices that can’t run it, only Safe mode is offered.
PLR and the DYN flag#
Some tracks are very dynamic: think classical music, film scores or a lightly mastered acoustic recording. Their peaks are far above their average loudness. Squeezing them through a limiter would ruin exactly what makes them sound good.
When a track’s PLR is above 18 dB, LiveMarks marks it [DYN] (shown in yellow). In Pro mode, a DYN track skips the mastering chain and is treated like Safe mode: clean gain, limited to the available headroom. The header then shows PRO (DYN) while that track plays.
UNANALYZED tracks#
Level matching needs a loudness measurement for each file. Files are normally measured when they are imported, but if a track hasn’t been measured yet, its column shows UNANALYZED [BYPASSED] in red, and it plays at its original level.
Tap ANALYZE in the console header to measure all missing tracks. A progress bar shows ANALYZING 3/8 while it works. You can also re-measure the whole library from Settings → Re-analyze loudness.
Save and schedule playlists#
- ⋮ → Save Playlist stores the current playlist under a name. Saved Playlists opens it again later. (Pro)
- ⋮ → Scheduled Playback starts a saved playlist automatically at a set time, with an optional 30-second fade-in.
For scheduled playback to start on time, allow exact alarms and turn off battery optimisation for LiveMarks when the app asks.